If you’re integrating a third-party application, custom script, or middleware with Business Central, you’ll need to register an application in Azure and grant it the right API permissions. This walkthrough covers the full process — from creating the app registration in Azure to enabling it inside Business Central itself. By the end, you’ll have a working Client ID and Client Secret that any external system can use to authenticate against the Business Central API.
Step 1: Open the Azure Portal
Head to https://portal.azure.com/#home and sign in with an account that has permission to register applications.
Step 2: Register a new application
From the Azure Portal, search for and open App registrations. This is where you’ll register the application that will represent your integration with Business Central.
Step 3: Create the registration
Click New registration, then:
- Enter a name for your application.
- Under Supported account types, select Single tenant.
- Click Register.
Azure will generate the application and take you to its overview page.
Step 4: Configure authentication
In the left-hand menu, click Authentication, then add a redirect URL:
Save your changes.
Step 5: Add API permissions
Next, click API permissions in the left-hand menu, then Add a permission.
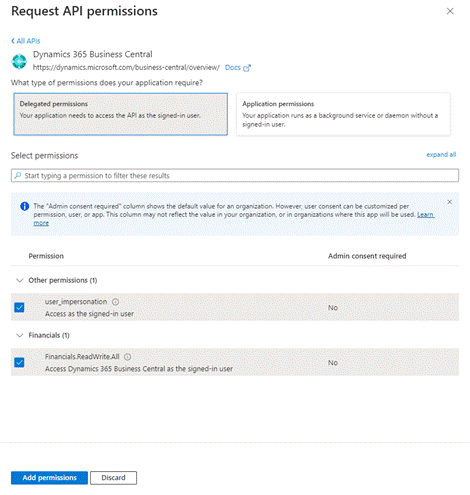
Selecting the Business Central API permission
Choose the Business Central API and select the permission type shown above, then click Add permissions.
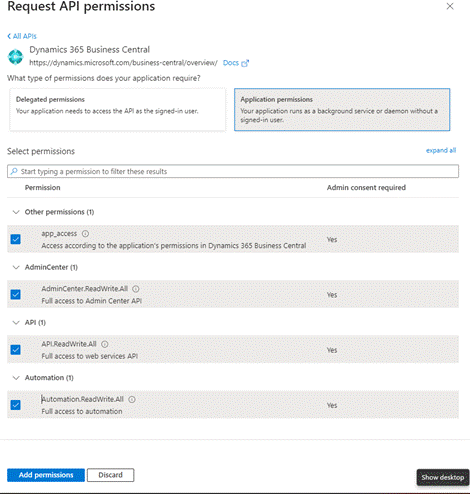
Configuring the full set of API permissions
Configure the complete set of permissions as shown, then confirm by clicking Add permissions again. Once added, it’s good practice to have an admin grant consent for these permissions so the app can use them without per-user prompts.
Step 6: Generate a client secret
Still in your app registration, go to Certificates & secrets and create a new client secret.
Once generated, Azure will show you two values — copy them immediately, as the secret value is only visible once:
- Secret ID — identifies the secret
- Secret value — the actual credential your integration will use to authenticate
⚠ Security note: Treat the secret value like a password. Store it in a secure secrets manager or vault rather than in plain text, and never commit it to source control or share it in screenshots or documentation.
Step 7: Connect the app registration to Business Central
With the Azure-side registration complete, switch over to Dynamics 365 Business Central.
Use the search menu to find Microsoft Entra Applications.
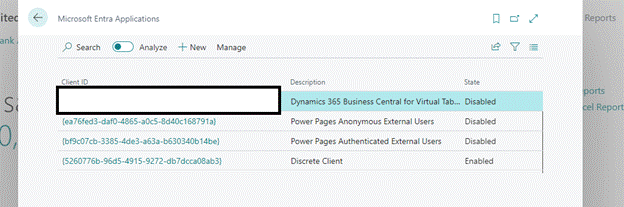
The Microsoft Entra Applications search result in Business Central
Click New to add your registered application.
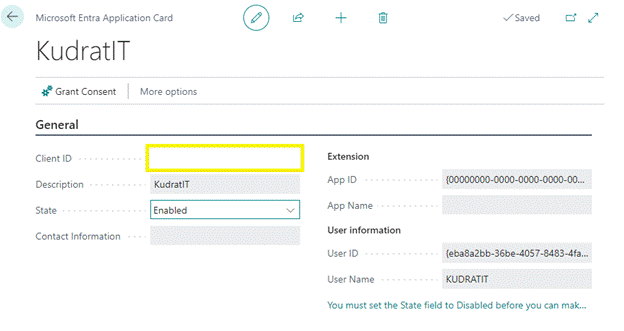
Adding a new Microsoft Entra application in Business Central
In the Client ID field, paste the Application (client) ID from your Azure app registration. Then:
- Set the State to Enabled.
- Assign the appropriate user permissions/roles so the application has the access it needs to the data and objects it will work with.
You’re all set
Your application is now registered in Azure and authorized inside Business Central. Any integration using this Client ID and Client Secret — with the OAuth 2.0 client credentials flow — will be able to authenticate and call the Business Central API according to the permissions you assigned.
A couple of things worth doing next:
- Test the connection with a simple API call (e.g., pulling a list of companies) before building out your full integration.
Review assigned permissions periodically, especially if the integration’s scope changes over time.


Leave a Reply